Welding Inspection Technology: The Latest in the Non-Destructive Testing of Welds

Welding is inspected using many different non-destructive testing methods. However, some of these inspection methods are more accurate and comprehensive than others. Thanks to advancements in technology, welding inspection technology has come a long way in recent years. New technology allows welding inspectors to provide results faster and more economically with greater accuracy and detail.

Let’s take a look at some of the advanced welding inspection technology that makes this possible.

Latest welding inspection technology

Choosing a non-destructive testing company for weld inspections

The Latest in Welding Inspection Technology

There are four key technologies that have helped to improve welding inspection.

These advancements in welding inspection technology offer many benefits. Therefore, when working with a non-destructive testing company that employs these advanced techniques and tools, organizations will benefit from:

  • Increased productivity
  • Cost savings
  • Higher quality inspections

Phased Array Ultrasonic Technology (PAUT)

What is PAUT?

Phased array ultrasonic testing, or PAUT, is a form of ultrasonic weld inspection. PAUT uses a single array of transducers to employ various ultrasonic beams at different angles and focal lengths. Multiple elements are pulsed in a patterned sequence. This allows specialized software to control the angle and focus of each beam, resulting in a more detailed scan.

Phased array ultrasonic testing capabilities

PAUT accurately detects various flaws and defects. As a result of its ability to evaluate materials and equipment from various angles, it is extremely effective for testing assets with complex structures.

Phased array ultrasonic testing is particularly well-suited for weld inspection. This welding inspection technology can detect flaws such as:

  • Lack of sidewall fusion, root penetration and root fusion
  • Porosity, etc.

What are the benefits of phased array ultrasonic technology?

Phased array ultrasonic testing offers several benefits for welding inspection. This is due to its ability to use multiple elements to direct and focus beams from a single piece of equipment.

The benefits of PAUT include:

  • Ability to inspect complex assets with greater ease and in less time
  • Increased probability of flaw detection in welds
  • Improved ability to determine the size of a defect
  • Enhanced accuracy and ability to specify the exact location of a flaw
  • Higher resolution and more detailed results
  • Ability to record data and images for review in the future

Time of Flight Diffraction (TOFD)

What is TOFD?

Similar to PAUT, TOFD is an ultrasonic testing technique. Time of flight diffraction uses high and low amplitude sound waves to detect flaws. When they come in contact with a flaw, these sound waves are diffracted. Some waves scatter, while others return to the receiving probe. TOFD technology measures the time it takes for these sound waves to be emitted and returned. The characteristics of the flaw are determined using this information.

TOFD capabilities

Time of flight diffraction is best for detecting and determining the size of flaws that are below the surface of a material. TOFD can also detect small flaws near the surface. However, this is a much more difficult task.

TOFD is effective for welding and corrosion inspection. This advanced welding inspection technology is highly reliable. It can also be used for pre-service and in-service testing.

What are the benefits of TOFD for welding inspection?

There are several benefits of TOFD:

  • Reliable detection and sizing of welding flaws
  • Fast
  • Economical
  • Provides recorded data for future review and reference

Total Focus Method (TFM) Technology

What is TFM?

The total focus method (TFM) is used in conjunction with phased array ultrasonic testing. Essentially, the TFM evaluates ultrasonic testing results in a more sophisticated fashion.

TFM requires the use of a full matrix capture (FMC). With FMC, each probe emits just one signal but receives every returning signal. This data is recorded in a matrix. The TFM algorithm then uses this matrix to create high-resolution images.

Total focus method capabilities

TFM is ideal for locating small flaws in various types of materials. This method is also useful for inspecting extremely thick components, welds, and detecting corrosion.

TFM and the M2M Gekko

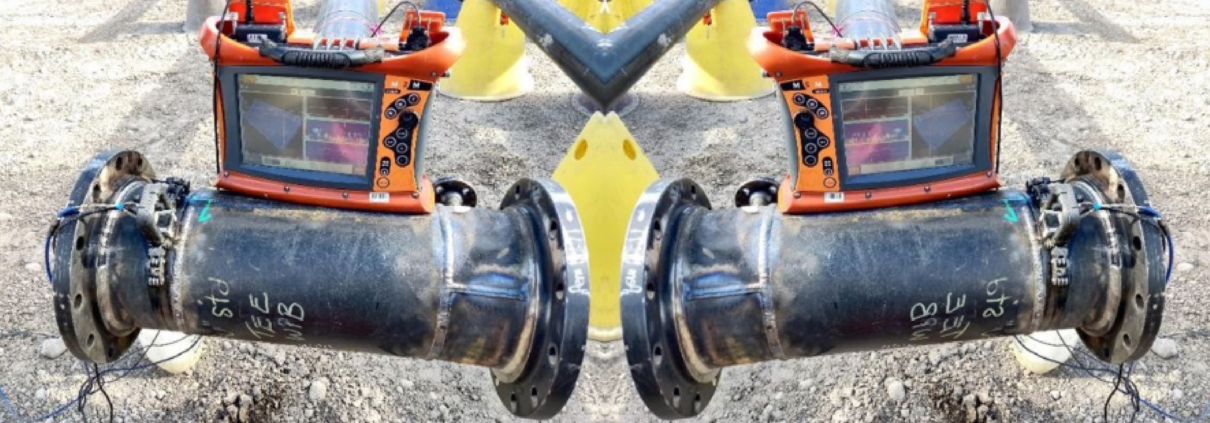
The M2M Gekko is a portable flaw detector that combines PAUT and TOFD with advanced TFM technology. As a result, this advanced welding inspection technology is versatile and offers high-quality imaging and extreme accuracy. Moreover, it allows non-destructive testing companies, like Buffalo Inspections, to conduct TFM inspections in the field.

What are the benefits of the TFM?

The total focus method has many benefits, including:

  • Offers the ability to thoroughly inspect various types of equipment and materials
  • Ability to detect tiny flaws, even in materials that are hard to inspect
  • Detailed results
  • Comprehensive 3D imaging
  • A single probe position can capture results from a large area

Laser-Induced Breakdown Spectroscopy (LIBS)

How does LIBS work?

This welding inspection technology employs a handheld LIBS analyzer, like the Z-300, to capture information about the atomic makeup of a material. The laser-induced breakdown spectroscopy analyzer uses highly focused laser pulses to create plasma on the surface of a material. As the atoms in the plasma return to their initial state, they discharge characteristic wavelengths of light. Subsequently, a built-in processor evaluates these wavelengths to effectively determine the elemental chemistry of the material.

Laser-Induced Breakdown Spectroscopy capabilities

This technique can accurately identify materials used in piping, pressure vessels, finished welds and more. As a result, the oil and gas industry commonly employs LIBS technology.

What are the advantages of Laser-Induced Breakdown Spectroscopy?

LIBS offers several advantages including:

  • Versatility – LIBS can characterize solids, gases and liquids
  • Simplicity – a handheld analyzer is easy to use and carries out the process in a single step
  • Offers the ability to identify multiple elements through a single analysis
  • Fast and convenient

In addition to the many benefits of laser-induced breakdown spectroscopy, the Z-300 handheld analyzer offers benefits of its own. Most notably, is the only handheld in the world that is capable of providing in-field analysis of elements like Li, Be, C, F, B, etc. As a result, it can provide more accurate and detailed inspection results.

Non-Destructive Testing Companies & Welding Inspection Technology

When working with a non-destructive testing company to evaluate welds, ensure that they use the latest welding inspection technology and methods. This will guarantee that you receive the most accurate inspection.

Buffalo Inspections employs the most advanced welding inspection technology available. This ensures the best possible results at the lowest possible price. As well, our NDT technicians are highly trained and experienced. Most importantly, they are well-versed in the latest NDT technologies. As a result, Buffalo provides the most detailed and reliable inspections possible.

Contact Buffalo Inspections today to learn more about our welding inspection technology and the value we can provide your organization.

Two men from Buffalo Inspections conducting welding inspections

Welding Inspections: Examining the Various Types of Welding Inspection

Welding inspections are extremely important for several reasons. Machinery, buildings, pipelines and other essential equipment and materials require welding that must be inspected to ensure safety and reliability.

Welding inspectors can employ various types of welding inspection. With the help of these welding inspection techniques, codes, and standards, welding inspectors can determine if a weld is suitable for its intended purpose.

But, what are these techniques and what types of welding inspection are the most common and reliable?

Let’s take a look.


What is the purpose of welding inspections?
What kind of inspections can be done on a weld?
How many types of welding inspections are there?
What is the most commonly used method of weld inspection?

What is the purpose of inspection in welding?

Welding inspections are important to determine if a weld meets certain codes and standards. In Canada, weld characteristics must meet the standards set out by the Canadian Standards Association (CSA). These regulations help inspectors ensure that machinery and materials can safely and effectively be used.

Certified welding inspectors conduct examinations using a number of tools and techniques. These inspections reveal data related to the size and quality of the weld. Most importantly, they identify any flaws or defects.

Flaws and defects can result in poor performance and safety issues. Therefore, welding inspections also help companies save money by detecting possible failures before they occur. This helps to reduce costs related to incidents, and asset loss, as well as protects employees, the public, and the environment.


Welding inspection being conducted by certified welding inspector

What kind of inspections can be done on a weld?

A weld can be inspected using both destructive and non-destructive techniques.

Destructive techniques physically destroy the weld to determine its viability. Commonly, when an inspector is conducting a destructive weld test, they will break a sample of the weld off to evaluate its strength and other characteristics.

On the other hand, non-destructive testing (NDT) techniques allow a welding inspector to examine the weld and its characteristics without causing harm. These techniques are commonly used by welding inspection companies in Canada.

Buffalo Inspections, for example, is a non-destructive testing company that employs NDT methods when evaluating welds.

How many types of welding inspections are there?

There are five common NDT welding inspection methods used in Canada. These include:

  1. Visual
  2. Radiographic (or X-ray)
  3. Ultrasonic
  4. Magnetic Particle
  5. Liquid Penetrant

Each type of welding inspection offers different advantages and disadvantages. The type of inspection that should be used depends on the asset, as well as the tools and technicians available.

Visual Inspection

Visual inspection, or VT, is the simplest form of NDT welding inspection. In this case, the welding inspector examines the weld visually to determine if any surface flaws are present. Weld size can also be examined to determine any possible issues.

This type of inspection is cost-effective and can be employed while work continues on a structure or material. However, visual welding inspections are limited, as only surface defects can be recognized. As well, in many cases, VT must be conducted throughout a project, especially if more than one layer of material is being deposited.

Often welding inspection companies will begin with a visual inspection to ensure there are no obvious defects.

Radiographic Testing

Radiographic inspection (RT), or X-ray, is a non-destructive testing method that is versatile and commonly used in Canada. This NDT method is employed to evaluate the internal quality of a weld. It can be used to identify internal flaws such as cracks, non-metallic inclusions, burn-through and more.

This inspection method is beneficial because the inspection is recorded on film. This film can then be used for subsequent examination, if necessary. However, several limitations also exist. First and foremost, the quality of the inspection relies on the skills and ability of the inspector and the equipment being used. As well, not all welds are suitable for this type of inspection.

Magnetic Particle Inspection

Magnetic Particle Testing, or MT, detects surface and near-surface flaws.

This NDT method will identify welding defects immediately. As well, sensitivity can be adjusted. This allows for various levels of flaw detection. As a result, welding inspections using MT can identify minor imperfections, including tight cracks and discontinuities.

Unfortunately, Magnetic Particle Testing can only be used on ferromagnetic materials, such as iron and steel. As well, some surfaces, such as those with a thick coat of paint, will not allow for this method of inspection. In addition, like other NDT techniques, a skilled inspector is needed to effectively conduct the inspection and identify any discontinuities.

Liquid Penetrant Testing

Liquid Penetrant Inspection, or PT, is used to identify surface cracks that cannot be detected by the naked eye. This method is common for detecting leaks due to welding flaws.

Unlike Magnetic Particle Inspection, PT can be used to evaluate magnetic and nonmagnetic materials. This method of inspection can help to detect very slight flaws. PT can also detect defects in materials with complex shapes.

However, Liquid Penetrant Inspection is limiting. This is because only surface flaws can be detected. Proper pre and post-inspection cleaning is also required.

Ultrasonic Inspection

Ultrasonic Testing, or UT weld inspection, can identify both internal and surface flaws. As well, UT can identify the location and measurement of a discontinuity.

This method is extremely sensitive, allowing inspectors to detect minor imperfections that other NDT methods will not recognize.

Using phased array technology allows for even more complex and accurate inspections. Phased Array Ultrasonic Testing (PAUT) allows welding inspectors to evaluate a component from multiple angles. This means components with complex geometry can be quickly and accurately inspected. However, this method requires the most skill and experience to properly interpret the results.

What is the most common weld test?

The two most common types of weld tests include Radiographic and Ultrasonic testing. These NDT methods are commonly used because they can detect internal flaws and irregularities. In addition, they can do so without destroying or affecting the integrity of the weld.


Two men from Buffalo Inspections conducting welding inspections

Do you require accurate welding inspections?

Buffalo Inspection Services offers NDT inspection services for CSA Standard W178.1. Our certified technicians inspect buildings, industrial structures, machinery, pipelines, piping, and more using the most advanced and up-to-date technology.

Our CWB certified inspection personnel and CWB level 3 Welding Inspector offer in-depth knowledge and valuable experience. As a result, we provide the most accurate and efficient welding inspections.

Contact Buffalo today to request a quote or schedule an inspection.

Use of digital twinning in the field

Digital Twinning and Enterprise Systems for the NDT Industry

2020 has come and gone and whilst most people are glad to see the back of it, there is and was much to be learned from it on the inspection front. While Zoom, Teams, Skype and Face Timing have become standard practices for business; digital twinning, remote inspection oversight, analysis and enterprise reporting within the inspection industry have not. While they are technologically possible, we have not been able to fully apply them during this transitional time due to legacy interpretations and habits not evolving.

What is Digital Twinning?

Digital Twinning (DT) for the purposes of this article, is the term given to a digital replication of the systems and devices used for inspection. It essentially means that an inspection can be done in Alberta and be directly linked in real-time to a screen anywhere in the world.

Benefits of Digital Twinning

The direct benefits of DT are that you can have one level 3 controlling up to 4 technicians, and potentially more, while providing analysis and reporting without having to be deployed to the site.

Digital Twinning and NDT

To this day, there are words in our codes that state “Direct oversight” must be in place for all inspections done by anyone other than a level 2 or 3 technician. National Standards and Company specifications mandate that inspections must be done by a level 2 or 3. Not much has changed on the inspection front within these documents that would allow for DT, Cloud, and enterprise technologies to be fully implemented. Bearing in mind that the legacy of many Standards and Codes, was based upon analogue technology with a low Probability of Detection, (in the order of 50% for manual shear wave), so “direct oversight” in the literal sense was essential and supported the codes and standards intent.

Cost Savings and Improved Efficiency

This year’s impact on business has resulted in a lot of clients asking for discounts and reduced pricing for inspection scopes. The lesson learned is that manageable price reductions must be correlated to improved or modified inspection practices, so the commercial viability continues to allow a solid and beneficial business relationship and maintains quality and consistency of results. In short, standards and specs need to come up to speed on newer technology and the digital realm, to improve efficiency, and allow productivity increases wherever possible, whilst maintaining the consistency and quality of the inspection task.

Digitization in the NDT Industry

After 40 years in this industry, I have seen more advancement in the last 5 years than I have in the previous 35. What has enabled this? A combination of software and hardware advances, reductions in hardware prices and a global cooperative that has enabled best practices to be standardized; plus, internet speed, interconnectivity, and cloud accessibility. The transition to the digital world has arrived and most of the equipment can now produce images from collected data and transmit it to the cloud for ease of access and analysis from anywhere. Data can be extracted in many forms and combinations to enhance and support this analysis.

Digitization has arrived for radiography (RT), ultrasonics (UT), eddy current (EC), visual testing (VT) and many other inspection disciplines. The ability to simply deploy and operate digital inspection equipment under the supervision of a qualified individual, through body cameras, digital twinning, and audio, while using developed applications programmed into the equipment to baseline key variables, is common sense. It also fulfills the direct oversight mandate from a 21st-century perspective. Interestingly, large projects who are raising significant amounts of capital are increasingly being told that digitization is a strategic necessity.

Implementing Digital Inspection Equipment

The key to supporting these initiatives is the training of technicians from a very early stage. When I came into this industry in the 80’s you did not really get to touch advanced inspection tools until you had all the academic tools to enable you, plus years of experience. What has changed?  Equipment has become more of an operability exercise than a full-on in-process analysis task, as most of the calculations and historically cerebral activities occur within the equipment itself.

Buffalo Examines the Viability of Digital Twinning

Our company’s research program for advanced UT (PAUT, TFM, Plane Wave) has undertaken several experiments to identify technical uncertainties with digital twinning and have identified data, equipment, and practical issues that supervision needs to be alert to.

What we did find was the innate ability of the younger technicians to operate newer digital equipment and quickly fathom out the operability elements that allow field deployment. The interface is key to this and the time and effort employed by software groups in improving this has been incredibly successful, based upon our findings. Bear in mind, that having a level 3 or highly experienced Level 2 overseeing this training is paramount to its success, as there are many nuances that need to be covered during training, related to key variables and how and when the application adjustments need to be considered.

The wonderful thing about digital technologies is once you have refined an application for a specified task it can be easily deployed for small or large quantities and you get imagery and data to support and verify all key variables. However, the geometric nuances and indeterminate signal responses are what require training and supervisory input to ensure a consistent quality of results and analysis.

During our experimentation, there were key variables such as hi/lo locations, material thickness variances and other geometric anomalies that needed to be documented to allow high confidence remote analysis. When there was still concern about an indication, application modifications or changes to the technique were required; this was part of the technician’s training focus to ensure competency in operating remotely with the equipment at hand. This was performed all while under the remote supervision of the Level 3.

Digital Twinning Training

Most digital equipment provides a 2D image and in many cases can also be used to render 3D images. This imagery is part of the learnings that have enabled the use of uncertified trainees to be successful in the deployment of advanced digital NDT equipment with Digital twinning.   Pattern recognition is the quickest and best way to teach, and the quality and accuracy of image formation on modern equipment is superb and very accurate if the correct info is provided.   Good technicians are prone to ask questions and are inquisitive, which helps the Level 3 in analysis.

While I have used advanced UT as the primary reference in this document to date, I have done so given it has the most variables to consider and was the focus of our research program.   Other disciplines such as RT can digitize in video form or image form as can Eddy current, ACFM, and visual through laser or video scanning, and their variable numbers tend to be way less than advanced UT, so technically and assumptively, that means that they should be easier to deploy.

Enterprise Systems

The client/customer pays for a report that evaluates the item inspected against a code or standard and which is verified or signed by a competent person. That means that in parallel with digital inspection technologies we need an enterprise reporting system that can support data, imagery, and the direct conversion of essential variable info onto the report. Additionally, it must be signed by a correctly certified technician for it to have any value.

The solution is an enterprise system with offline and online capabilities that enable the transfer of data through the cloud or directly, that can be incorporated into a final document in any form (numeric, text, image, or video). This can then be accessed by the customer or any approved entity that needs to review or receive it. These systems are available commercially, or in my company’s case, we created one tailored for our needs (Connex). Over the last 10 years, we have been updating its capabilities continuously to support the newer technologies and the parallel commercial elements that support all inspection activities.

Enterprise System Challenges

The one challenge that currently exists is data file size in the case of advanced UT or video. Should the client want a complete copy of the data file it can sometimes run up to 4 gigabytes in size (technique dependent). When only a report with still images is needed, then file size is easily accommodated. Remember that anything is possible if enough time, intelligence, and money is available, but we are always constrained by the commercial necessities presented.

We are currently involved with a multinational partner in the digital RT sector where we are trying to place a fully marked-up radiographic image onto the RT report (all digitally of course) within the enterprise system. This research has a guaranteed outcome with the existing technology we have. It can also be replicated across all disciplines.

An additional and noteworthy concern of an enterprise system is ensuring the system structure is secure enough to guarantee the clients’ outcomes and give them a high level of confidence in the quality of the outputs. These concerns are specific to each client but are driven by good process and practices.

The Future of NDT

How we select candidates to deploy these transformational technologies is a science in itself; trainees need to be motivated to not only execute inspection in the field, with all its incumbent challenges but to be scholarly in the pursuit of knowledge associated with these challenges. Our experience with this element of the digital transformation has been interesting. Younger people interested in inspection are not keen on sitting in classrooms for extended periods of time, they want to be fully immersed and be earning revenue as soon as possible, then progressively learn as they go. The digital world allows this with online learning and as long as they have a committed mentor to learn from, they can quickly become productive employees.

Our experience with using these methods has demonstrated savings of up to 40% against the current inspection protocols being deployed. It is only a matter of time and desire before we are all on the same page.


Andrew Crawford BSc, BTech, PG Dip NDT, CGSB L3
TQMS, Buffalo Inspection Services